LED Candles at Home
Learn how to make LED candles at home. Step-by-step DIY guide with components, circuit, working principle, and decoration tips for safe glowing candles.

What is an LED Candle?
An LED candle is a battery-powered light source that mimics a real candle using LEDs. It can have a steady glow or a flickering effect to simulate a real flame.
Advantages:
- Fire-safe and child-friendly
- Reusable and long-lasting
- Can be made in different sizes and colors
- Easy and inexpensive DIY project
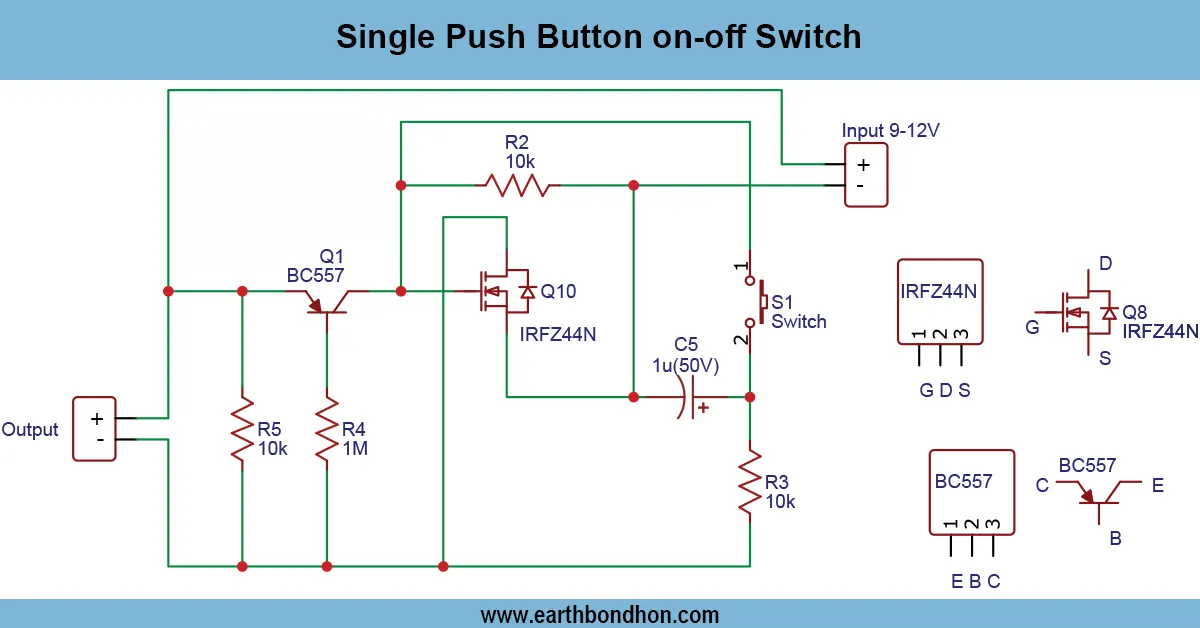
Flickering LED candle circuit
LED candles consist of less fire and more decorative candles that are a safer and less threatening substitute to real candles. They are extensively applied in domestic decor, festivals, events, and educational electronics applications.
This tutorial describes the process of creating LED candles in your house with the help of some simple and easy-to-find materials such as LEDs, resistors, and batteries. You will get to know the working principle, step-wise construction, circuit diagram, flickering effect, tips to be used in its decoration, and safety precautions. It is a project that an electronic enthusiast, hobbyist, and student would want to handle as an alternative to candles that are safe to use as decorations or to study with.
LED Candle – Complete DIY Guide
Applications of LED Candles
- Home decoration and lighting
- Festivals like Diwali, Christmas
- Safe candles for kids and pets
- Centerpieces for events
- Educational electronics projects
- DIY gifts and crafts
Components Required
| Component | Specification |
|---|---|
| LED | Warm white or yellow, 5mm or 10mm |
| Resistor | 220Ω–1kΩ |
| Battery | 3V coin cell or 1.5V AAA |
| Capacitor | Optional for flicker effect |
| Transistor | Optional for flicker circuit |
| Wires | Thin hookup wire |
| Breadboard/PCB | For assembling circuit |
| Candle casing | Plastic, paper, or old candle shell |
| Switch | Slide or push button |
Working Principle of LED Candle
LED Flickering Effect
Flickering is created using a transistor oscillator or PWM to vary LED brightness.
Battery Power Supply
Low-voltage batteries like coin cells or AA/AAA make the candle safe and portable.
Simple Electronic Circuit
A basic LED + resistor glows steadily; adding a transistor or 555 timer creates a flickering flame effect.
LED Candle Circuit Diagram
- Connect LED anode → resistor → battery positive.
- LED cathode → battery negative.
- Optional: Add transistor or 555 timer for flickering.
- Use capacitor to smooth flicker randomness.
- Add switch for on/off control.
Step-by-Step Construction Guide
- Select your candle casing.
- Insert LED in flame position.
- Connect resistor in series.
- Connect battery holder and switch.
- Optional: Add transistor or IC for flicker.
- Test LED + flicker effect.
- Secure wiring inside casing.
- Decorate the candle for realistic appearance.
Decorating Your LED Candle
- Use wax or clay for realistic shape.
- Paint or wrap with paper/plastic.
- Add faux flame tips.
- Group multiple candles for ambience.
Safety Precautions
- Use only low-voltage batteries.
- Avoid short circuits.
- Secure LED positioning.
- Never use with high voltage.
Tips for Realistic Candle Effect
- Use warm-colored LEDs.
- Vary flicker frequency using capacitors or timers.
- Diffuse light using tissue paper or translucent material.
- Use a proper candle holder for stability.
Troubleshooting
LED Not Glowing
- Check polarity of LED and battery.
- Check resistor connections.
Flicker Not Working
- Verify transistor or IC wiring.
- Adjust capacitor value.
Battery Drains Quickly
- Use low-current LEDs.
- Increase resistor value slightly.