How to Make 100 Watt Inverter
Learn how to make a 100 Watt inverter at home. Step-by-step DIY guide with components, circuit diagram, working principle, and tips for reliable operation.

Small wattage inverter circuit
One such feasible DIY electronics project is a 100 Watt inverter, which can be used to convert 12V DC from a battery into 220V AC to power small appliances or other devices. It is a perfect inverter to be used in the home for emergency backup and for small electronics experiments.
Home-made DC to AC inverter
The inverter functions by operating on an oscillator circuit to produce a square wave AC signal from the DC supply. The signal is then boosted up using transistors or MOSFETs to run a step-up transformer, which delivers high voltage AC at the output. The DIY 100W inverter can offer an effective and economical way of powering devices with low wattage where there is no power supply on mains electricity.
This manual describes all the parts, the principle of operation, circuit diagram, and m step-by-step procedure to construct a safe inverter (100W) at home.
Key Features and Advantages
- Converts 12V DC to 220V AC
- Maximum output 100 Watt
- Simple DIY construction
- Can power small appliances, lamps, and electronics
- Low-cost and efficient for small-scale use
Components Required for 100 Watt Inverter
- 12V DC battery (7–12Ah)
- Step-up transformer (12V to 220V, 100W)
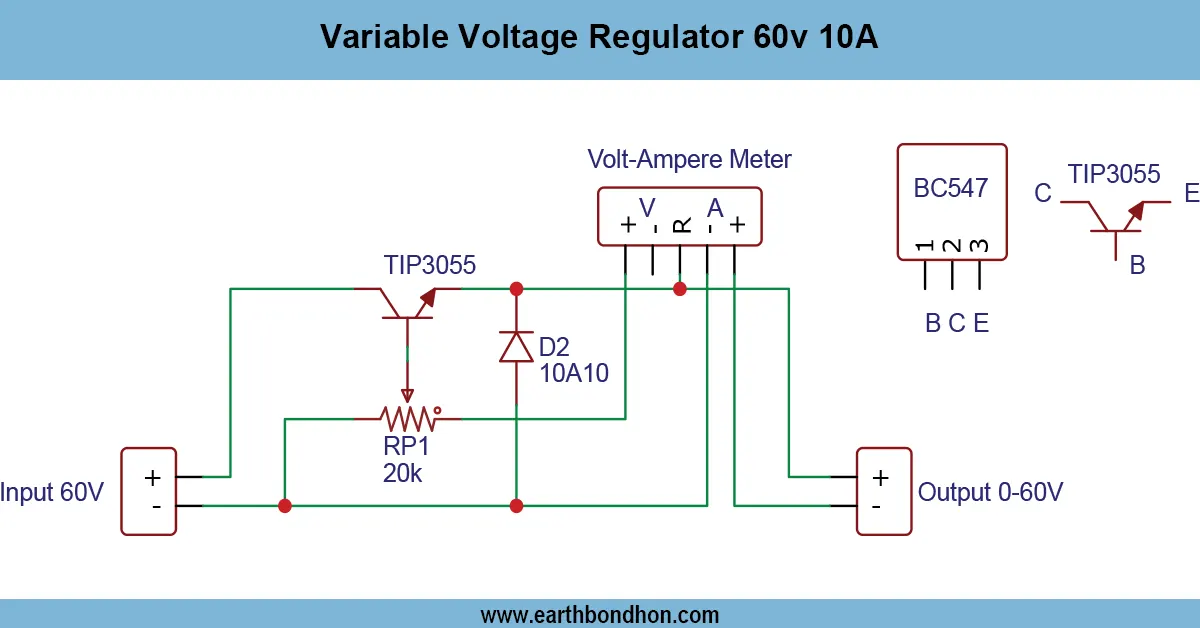
- Power transistors (e.g., TIP31C / TIP3055)
- IC 555 timer (for oscillator) or CD4047
- Resistors for biasing
- Capacitors for filtering and timing
- Heat sinks for transistors
- Connecting wires and PCB / breadboard
- Fuse for protection
Working Principle
DC to AC Conversion
Battery DC voltage is converted into AC by the oscillator circuit.
Oscillator Stage
IC 555 or CD4047 generates a square wave AC signal at 50Hz (or 60Hz).
Power Amplification
Transistors or MOSFETs amplify the AC signal to drive the transformer.
Transformer Step-Up
The step-up transformer converts 12V AC (generated from DC) to 220V AC output.
Output Waveform
Basic inverters produce a square wave suitable for simple loads. Modified sine wave designs can be added for sensitive electronics.
Circuit Diagram of 100 Watt Inverter
- Connect the battery to the oscillator IC input.
- Oscillator IC generates 50Hz–60Hz pulses.
- Transistor amplifier increases power level.
- Connect amplifier output to transformer primary.
- Transformer secondary outputs 220V AC.
- Add fuse and heatsinks for safety and stability.
Step-by-Step Construction Guide
- Mount IC 555 or CD4047 on PCB.
- Connect timing resistors and capacitors to achieve 50Hz.
- Assemble a transistor / MOSFET amplifier with proper heatsinks.
- Connect transformer primary to amplifier stage.
- Wire the battery input and add a fuse.
- Connect transformer secondary to the AC load output.
- Test the inverter with a low-watt device first.
- Ensure transistors remain cool and stable during operation.
Applications of 100 Watt Inverter
- Power LED lights or small fans
- Emergency backup for small home appliances
- Low-power electronics experiments
- Battery-powered DIY electronics projects
- Outdoor camping or remote-area power source
Safety Precautions
- Never touch the transformer’s 220V output.
- Use proper insulation and correct fuse rating.
- Do not exceed 100W load.
- Ensure efficient heatsinking for all transistors.
- Always test using low-power devices first.
Troubleshooting Common Issues
No Output or Low Output
Check battery voltage, oscillator wiring, and transistor condition.
Overheating of Transistors
Add larger heatsinks or a cooling fan. Reduce the load if the temperature remains high.
Distorted AC Output
Verify oscillator frequency, switching balance, and add filtering capacitors if necessary.