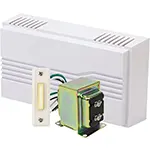

Doorbell Wiring Diagram
Wiring diagram for connecting a doorbell system to 4 rooms. Learn how to use push buttons, bells, and transformers for clear alerts in multiple rooms.

Corridor light circuit diagram
The wiring system that contains 4 rooms and a single switchboard is capable of turning off the alerts in one specific elucidation of the doorbell with bells or buzzers in different rooms. This kind of system can be applied at homes, clinics, or offices to be used where there is a need to notify various occupants one by one. The wiring diagram illustrates the connection of push buttons to buzzers or bells in four rooms to be powered by a transformer. This is a wiring solution that is simple, effective, and easy to maintain, and everybody is notified in the right place without the intricate intercom systems.
Basic Formula for Load Calculation:
Total Load (W) = Voltage (V) × Current (A)
Example: If each doorbell uses 12V and draws 0.2A, then for 4 rooms:
Total Load = 12V × 0.2A × 4 = 9.6 Watts
Key Components in Table Format
| Component | Quantity | Purpose |
|---|---|---|
| Push Button | 4 | Trigger bell in each room |
| Door Bell | 4 | One per room |
| Transformer | 1 | 12V or 24V supply |
| Selector Switch | Optional | To choose which room to ring |
| Wire (Low Volt) | As needed | Connects components |
corridor hallway wiring connection
The 4-room doorbell wiring diagram assists in the installation of a single-bell system with a variety of buttons in order to notify particular rooms. This is a very good system when it comes to houses, small offices, or clinics. The push button can be dedicated to a single room or wired in a common circuit with a selector switch. The diagram usually encompasses a 12V/24V transformer, doorbells (either buzzers or chimes), and wire conduits. The system is charged with a centralized transformer, and the bell in the concerned room rings when we press a push button. This form of multi-room setup is affordable, and the communication or notification is timely. This should be done through proper low-voltage wire and a secure mode of installation.
2 way switch corridor lights wiring diagram
| Room No. | Button ID | Bell Status | Wire Length (approx) | Remarks |
|---|---|---|---|---|
| Room 1 | B1 | Ringing | 12 ft | Working |
| Room 2 | B2 | Silent | 15 ft | Button not pressed |
| Room 3 | B3 | Ringing | 18 ft | Active Circuit |
| Room 4 | B4 | Silent | 20 ft | Standby |