

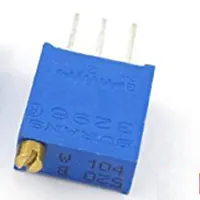


potentiometer wiring
Control the brightness of a light using a potentiometer. Simple wiring with AC or DC lamps allows adjustable illumination for home, DIY, and hobby projects.

potentiometer light dimmer
The light brightness control circuit is a potentiometer circuit to enable smooth control of lamp intensity. The resistance to the light is adjusted so that the current or voltage sent to it is decreased or increased, to dim or brighten up the light.
DIY lamp dimmer project
Potentiometer Wiring Light Brightness Control is an easy mechanism for controlling the brightness of a lamp or an LED. A potentiometer is a variable resistor and is used to regulate the amount of voltage or current given to the light. In DC circuits, the potentiometer may directly regulate the current to an LED or lamp, and change the brightness continuously. With AC lamps, a dimmer can be made using a TRIAC and the potentiometer in order to regulate the brightness. This arrangement is most suitable for indoor electrification, for hobby work, and for amateur electronic projects. Adequate choice of the potentiometer rating will avoid flickering or dimming. This circuit is small and simple to install, thus enabling the user to regulate the intensity of the lights manually, which is more energy efficient and comfortable. It applies to small lamps, light-emitting diodes, or hobby lighting systems.
Work / Installation (Inputs → Outputs)
- Power Supply → AC mains or DC source.
- Potentiometer → Acts as a variable resistor to control current/voltage.
- Light Load → Lamp or LED connected in series or with TRIAC for AC.
- Output → Brightness of the light varies as the potentiometer is adjusted.
- Installation → Connect the potentiometer in series with the DC lamp or via a TRIAC for AC. Mount in an accessible location for manual adjustment and ensure proper insulation.
Testing & Final Adjustments
Wire the potentiometer and, after wiring, adjust the potentiometer gradually and monitor the brightness. In the case of DC lamps, be sure that the voltage/current ratings of LEDs or lamps are not exceeded. With a Can lamp and a TRIAC dimmer, smooth dimming, no flicker or noise. Fine-tune the potentiometer rating or wiring in case the performance is not smooth. All connections should be well sealed to avoid shocks. Check positionally to make sure that there is a full dimming range. Reliable, safe, and adjustable light control of home, DIY, and hobby electronics projects is guaranteed by proper testing.
Frequently Asked Questions - potentiometer wiring:
What is a potentiometer used for?
It acts as a variable resistor to adjust current or voltage.
Can it control AC and DC lights?
Yes, DC directly; AC requires TRIAC-based dimmer circuit.
What rating potentiometer is needed?
Depends on lamp voltage and current; typically 10k–50kΩ for small lamps.
Is it safe for beginners?
Yes, with proper insulation and voltage awareness.
Can I use it with LEDs?
Yes, for DC LEDs with proper series resistor.
Does it save energy?
Yes, dimming reduces power consumption of lamps.
Can multiple lamps be controlled?
Yes, connected in parallel or series depending on configuration.
Is flicker normal?
No, proper potentiometer and TRIAC selection avoids flicker.
Applications?
Home lighting, hobby projects, adjustable LEDs, DIY experiments.
Can brightness be adjusted continuously?
Yes, potentiometer allows smooth continuous control.


