


Solar Panel Wiring Connection
Learn how to wire solar panels into a house system with a charge controller, battery, inverter, and loads for a safe and efficient DC/AC home power supply.

solar energy home installation:
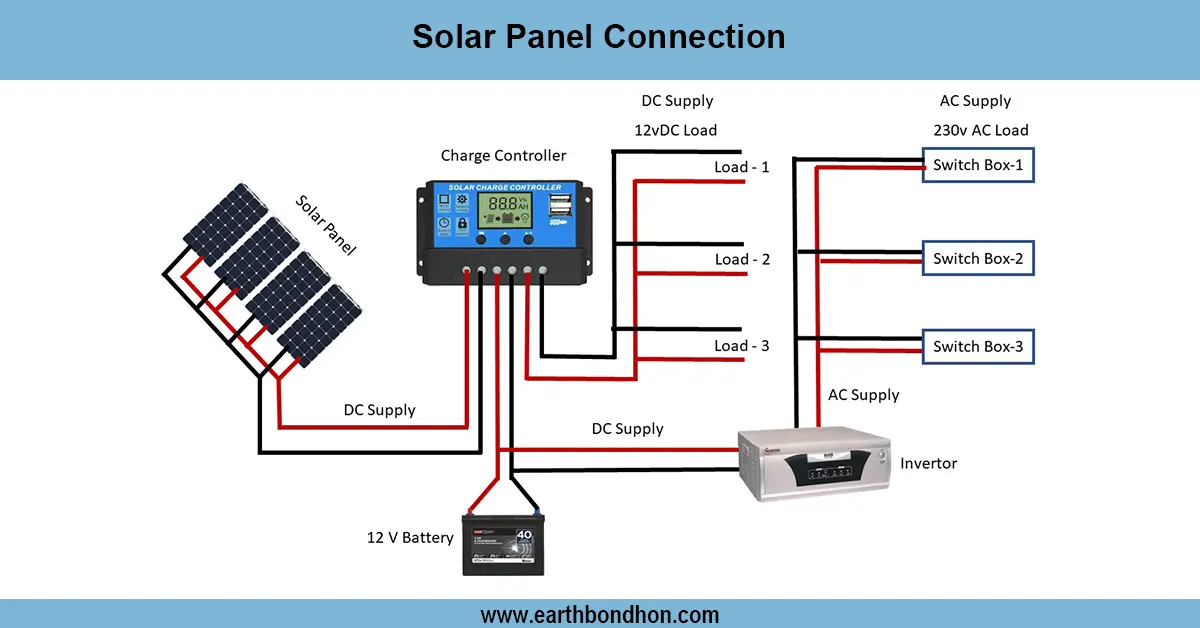
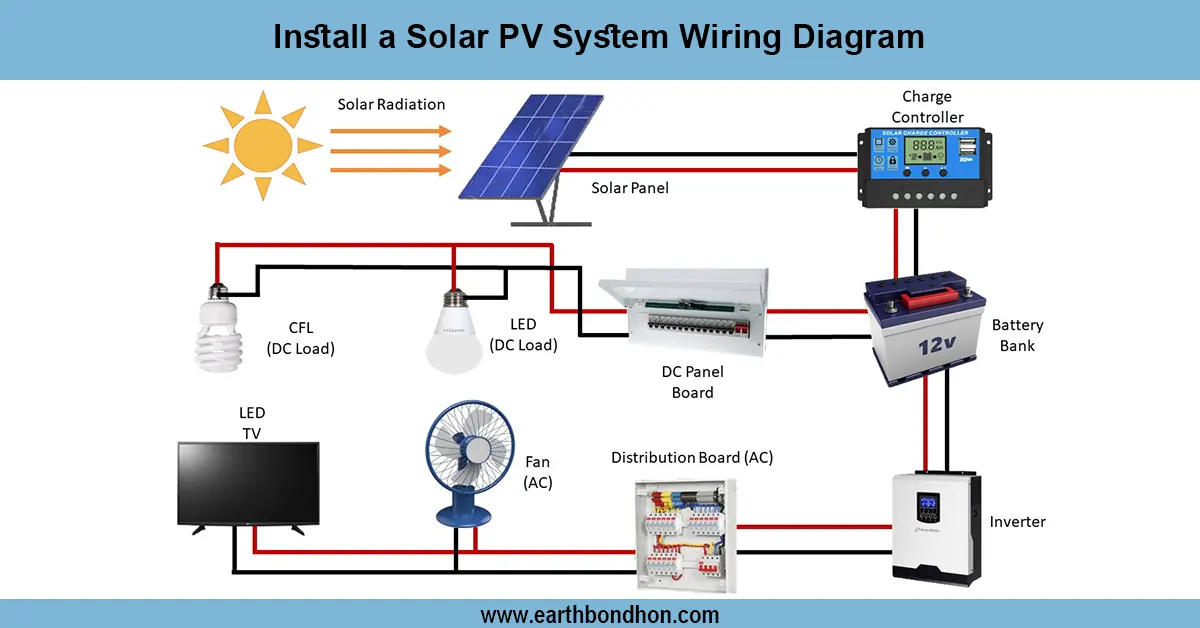
A solar panel wiring connection in a house wiring diagram shows step-by-step how to integrate solar panels into a home electrical system. The main components include solar panels, a charge controller, a battery, an inverter, and home loads. Solar panels produce DC power, which passes through a charge controller to charge the battery safely. DC loads can be powered directly, while AC appliances require an inverter. Panels can be connected in series to increase voltage or in parallel to increase current, depending on system requirements. Proper wiring with correct cable sizing, polarity checks, and fuses ensures safe and efficient operation. This setup allows homes to utilize renewable energy, reduce electricity bills, and provide backup power during outages. Suitable for off-grid homes, small offices, or hybrid systems, this wiring diagram helps homeowners implement a reliable and efficient solar power solution.
solar panel house connection:
A solar panel wiring connection in a house wiring diagram illustrates how to safely connect solar panels to a charge controller, battery, inverter, and home loads. It ensures efficient DC/AC power supply and battery management for residential use.
⚡ Work & Installation (Input → Output):
- Input: Solar panels generate DC electricity from sunlight
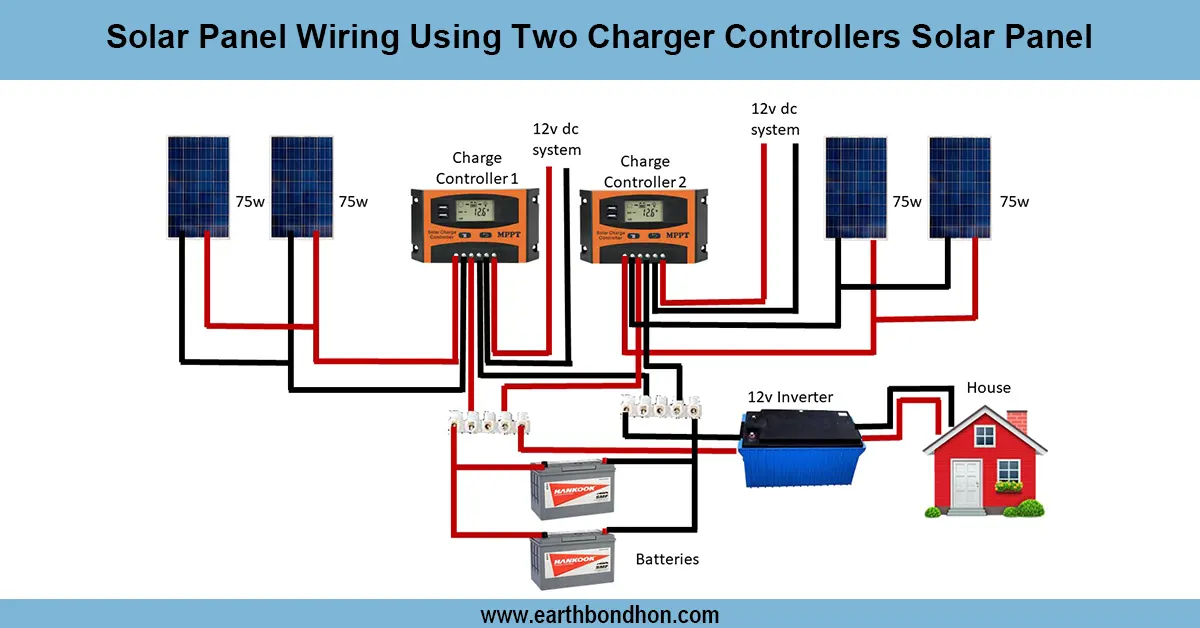
- Step 1: Panels connected in series/parallel to the charge controller
- Step 2: Charge controller regulates voltage and current to battery
- Step 3: Battery stores energy for DC or AC loads
- Step 3: DC loads powered directly; AC loads powered through inverter
- Output: Clean and stable electricity for lights, fans, appliances, and backup power
Testing & Final Adjustments:
After wiring, first verify all connections for correct polarity using a multimetersolar panel voltage voltage and Current to ensure the charge controller operates properly. Connect the battery and confirm the charging status. Test DC loads such as lights and fans, and measure voltage at load terminals. Connect the inverter and check the AC output voltage for appliances. Ensure fuses and circuit breakers are installed appropriately. Inspect cables for correct sizing, insulation, and secure connections. Adjust the tilt and orientation of panels for maximum sunlight exposure. Monitor the system over a full day to confirm proper battery charging, load operation, and uninterrupted power supply. Regular maintenance, including cleaning panels and checking battery health, ensures long-term reliability and efficiency of the home solar system.
Frequently Asked Questions - Solar Panel Wiring Connection:
How do I connect solar panels to house wiring?
Connect panels to charge controller, battery, and inverter, then to home loads following series/parallel configuration.
Do I need a charge controller?
Yes, to regulate voltage and current to safely charge the battery.
Can I power DC and AC appliances?
Yes, DC loads connect directly to battery, and AC loads require an inverter.
How should panels be connected?
Series for voltage increase, parallel for current increase, or a hybrid setup.
What voltage systems are common?
12V, 24V, or 48V DC depending on battery and inverter specifications.
Are fuses necessary?
Yes, fuses protect wiring, battery, and loads from overcurrent.
Can I mix different panels?
Not recommended; use similar voltage and current panels for efficiency.
How to test the system?
Measure voltages at panels, controller, battery, and loads; verify charging and load operation.
Does it work at night?
Yes, the battery stores energy during the day for nighttime use.
Is it safe for home use?
Yes, with proper wiring, correct cable sizing, fuses, and polarity checks.