Deep Fryer Wiring
Learn deep fryer wiring diagram, including heating element, thermostat, timer, and safety switches for efficient and safe kitchen operation.

kitchen appliance electrical wiring
The wire in the deep fryer is used to connect the heating element, thermostat, timer, and safety device to fry efficiently and safely. The correct electrical connections provide temperature regulation, overheating prevention and can be successfully used in kitchens.
fryer temperature control wiring
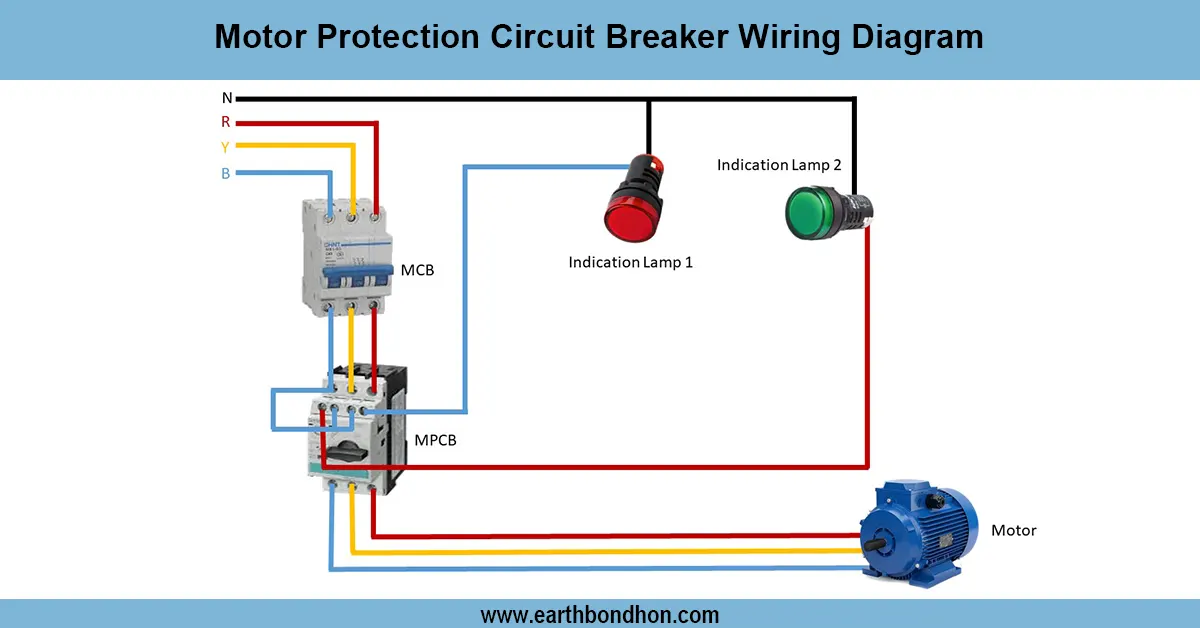
Deep fryer wiring diagram deep fryer wiring diagrams are used to make sure that commercial or home deep fryers operate safely. The system consists of a heating component, a thermostat, a time controller, power control, indicator lamps, and safety cut-off switches. The primary supply flows through the switch in power that enables the fryer to be turned ON/ OFF. The thermostat controls the amount of heat in the oil by connecting or disconnecting the heating coil. The heating element can be automatically switched off after a prescribed cooking period by the timer. There are power and heating indicator lamps. Safety mechanisms are installed, e.g., thermal cut-off switches or fuses, to eliminate overheating and electrical risks. Proper wiring can guarantee effective heating, accurate temperature regulation, overcurrent or overheating protection, and dependable functioning. The heating element should be tested to ensure that it works and the thermostat regulates the required temperature, the timer is working, and the safety devices are functional.
Work & Installation (Input → Output Summary)
- Main Supply enters fryer through power switch.
- Power ON activates indicator lamp and supplies current to heating element.
- Thermostat monitors oil temperature; opens or closes heating circuit.
- Timer can disconnect heating element after preset duration.
- Safety Cut-Off or thermal fuse disconnects supply in case of overheat.
- Heating element warms oil; fryer operates safely and efficiently.
Testing & Final Adjustments
- Verify proper insulation of wires and secure connections.
- Turn power switch ON; indicator lamp should light.
- Check that the heating element heats the oil gradually.
- Adjust thermostat; ensure it opens and closes at set temperatures.
- Test timer; heating element should switch OFF after preset time.
- Simulate overheat condition; safety cut-off should disconnect power.
- Inspect terminals, switches, and fuses for secure installation.
- Confirm smooth operation without sparks or excessive vibration.
- Test repeated ON/OFF cycles to verify reliability.
- Record testing results for maintenance and safety documentation.