

Solar panel at home using dark Sensor
Learn how to connect a solar panel at home using a dark sensor wiring diagram for automatic light control, battery charging, and efficient energy use.

Solar Light Sensor for Street Lighting Systems:
A solar panel at home using a dark sensor wiring diagram provides automatic lighting by switching ON lights at night and OFF during the day. It combines solar charging with an LDR sensor and relay to ensure efficient, hands-free energy use.
Solar Light Sensor for Outdoor Security Lighting:
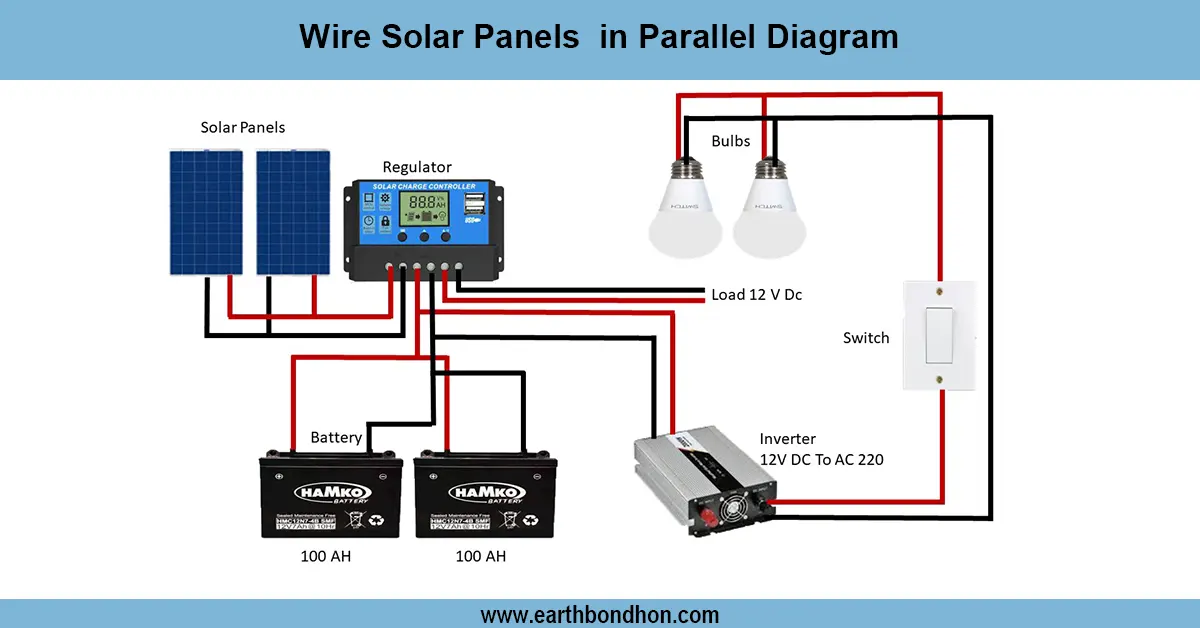
A dark sensor wiring diagram for a solar panel at home is an intelligent method of using a solar panel to wire lights to turn on at night. This mechanism operates by charging a battery during the day using the solar panel, and the dark sensor (LDR with relay) senses the lack of sunlight and switches ON the light load attached to it. This system is designed to save energy, operate automatically, and have a stable backup power. These are the essential elements, which are the solar panel, charge controller, battery, relay circuit, LDR sensor, and the load (light or fan). Installation involves hooking up the solar panel to the charge controller, which controls the battery charging. The power is then directed out of the battery to the relay, which is managed by the dark sensor, so that the load can only be on when it is required. This system is applicable in garden lights, street lights, and home lighting solutions. It minimizes the switching process by hand and maximizes the use of solar power.
⚡ Work & Installation (Input → Output):
The solar panel converts sunlight into DC power and charges the battery through a charge controller. The dark sensor (LDR + relay) monitors light levels. When sunlight is absent, the relay activates and powers the load (bulb/fan). In daylight, the sensor disconnects the load to save energy. The complete wiring ensures smooth input (solar → controller → battery) and output (battery → sensor → load).
Testing & Final Adjustments:
Once the system is installed, test it during the day and at night. During the day, the battery should be charged by the solar panel with the load turned OFF. The dark sensor ought to activate the relay at sunset or during the darkness and automatically switch on the load connected. Change the LDR sensitivity when the light is being activated too soon or too late. Also, ensure the battery voltage remains within a reasonable limit, commonly 11 -14.4V with a 12V system. Make sure that there are the right polarity connections and the wiring is insulated to prevent short circuits. Lastly, check the system at least 24 hours to ensure that the operation of the charging, switching, and loading is free and effective. When adjusted properly, such a system will offer reliable automatic lighting that will not be under manual control.