Digital Timer Switch in Motor Wiring
Learn how a digital timer drives a contactor to switch high-load circuits automatically—safe wiring, step-by-step setup, testing, and FAQs.

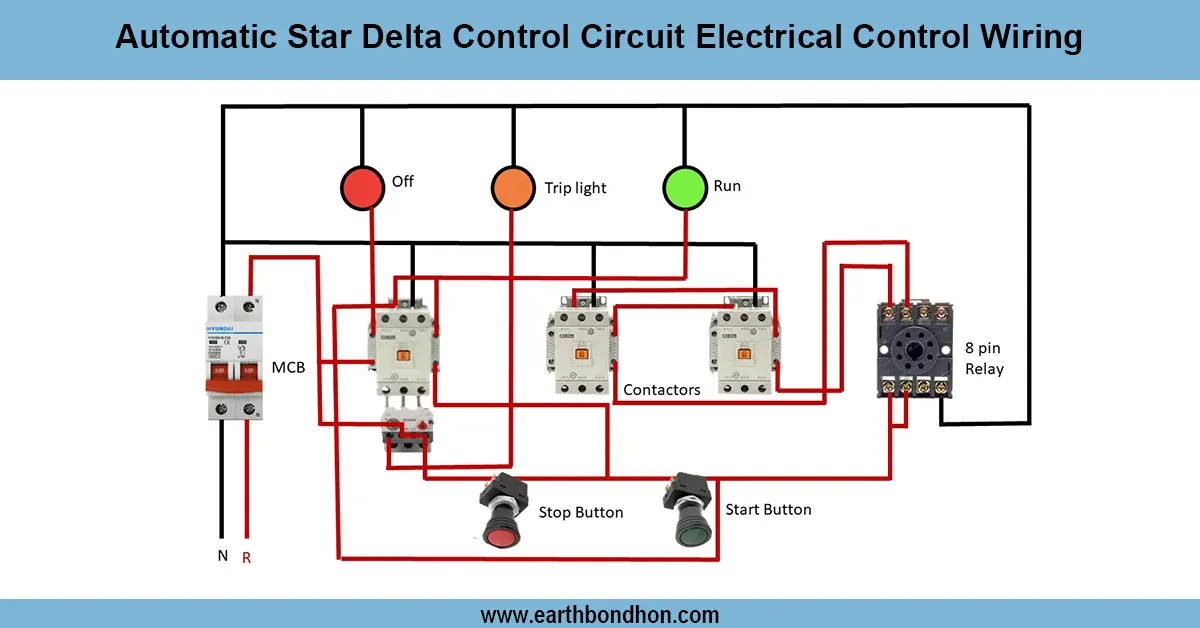
Relay switch connection
Connect the output of the timer to A1 / A2 of the contactor coil, the main supply through the MCB/RCCB to the load. The load is automatically switched on/off by the timer.
Boouppp and configure a temporary ON/OFF program. Check coil voltage at A1A2 with ON. Shuts off cleanly and pulls out when OFF. Measure load voltage/current; verify phase/neutral polarity, earth continuity, and MCB/RCCB trip operation. Adjusted timer clock, weekday schedule, and manual/auto mode. Attach tight terminals, ferrules/labels, and mount a control-side fuse when not installed.
Relay assembly diagram
In a digital timer wiring diagram, a contactor indicates the manner in which a programmable timer regulates high current loads in a safe manner. The digital timer controls the scheduling, whereas the contactor turns the main power on and off between motors, pumps, heaters, or lights. The contactor coil (A1/A2) is fed by the output of the timer; on energizing, the main contacts close and provide power to the load, and on de-energizing, the contacts open to isolate it.
Common circuit: Supply MCB/RCCB Digital Timer (control), Supply Contactor Coil, and Contactor Main Contacts Load. Neutral and earth should be properly wired, and a control fuse should be installed to cover the timer circuit. This process decreases manual operation, eliminates arcing at low-voltage switches, and increases reliability and energy efficiency with precise schedules. It is suited to water pumps, street/area lighting, HVAC, and industrial machinery.
Work / Installation (Inputs → Outputs)
Input: Main supply → MCB → RCCB.
- Feed phase/neutral from RCCB to the digital timer (power).
- Use the timer’s relay output to supply the contactor coil A1; connect A2 to neutral (or opposite for DC coils).
- Route the main phase through the contactor’s L1/L2/L3 → T1/T2/T3 (use one pole for single-phase). Connect neutral directly to load (or via a pole if 2-pole contactor).
- Bond protective earth to all metal enclosures and to the load. Output: When the timer closes its relay, the coil energizes, contactor closes, and the load receives power per schedule.
Frequently Asked Questions - Digital Timer Switch in Motor Wiring:
What does the timer do in this setup?
It schedules ON/OFF times and energizes the contactor coil.
Why use a contactor instead of a switch?
Contactors safely switch higher currents and reduce arcing.
Which terminals on the coil?
A1 and A2 are the coil terminals for AC/DC as rated.
Can I run a single-phase load?
Yes, route phase through one or two poles and neutral as required.
Do I need an MCB/RCCB?
Yes, MCB for overload/short and RCCB for leakage protection.
What coil voltage should I choose?
Match the control supply (e.g., 230V AC or 24V DC).
Can I add a manual override?
Yes, use the timer’s MAN/AUTO or add a selector across the coil.
How to protect the timer relay?
Use the contactor for load switching and a small fuse on control.
What about surge suppression?
Use RC snubber/varistor or diode (for DC) across the coil.
Where is it used?
Pumps, lights, heaters, compressors, and HVAC fans.