


One Button in Timer Wiring Diagram
Learn one-button timer wiring to control motors or lights with a single push, enabling delayed activation and automated operation safely and efficiently.

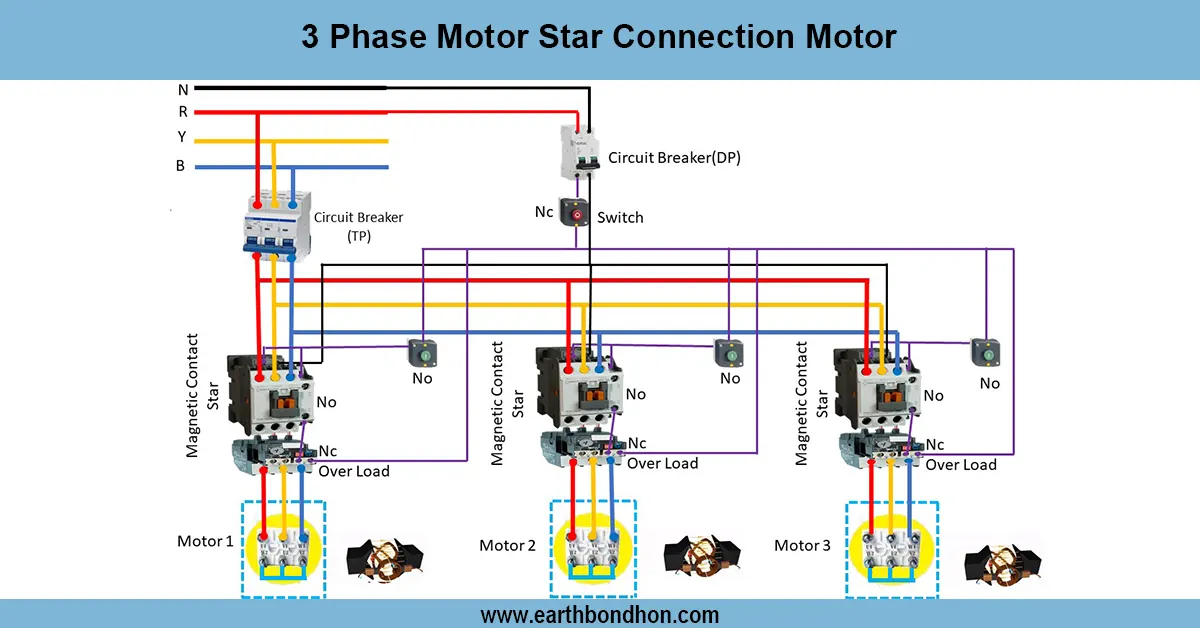
motor timer push button diagram
Single-button timer wiring permits a load to be operated by one push. Once the button is pressed, the timer then waits until the preset delay is reached before either the motor or lamp turns on to allow automated and safe use.
automation push button wiring
Only a single push button is needed to control a motor, lamp or other electrical load with one-button timer wiring. When the button is pushed, the timer coil is turned on, and, after the delay is preset, the output contacts turn on the load. This arrangement is common with motor delayed starts, or sequential lighting or automation circuits. The AC or DC source is attached to the timer input, and the load is connected via the timer output contacts. Safety requires proper connections of neutral and earth. The testing is done by pressing the button and ensuring that the load is activated at the desired delay. Single-button operation and ease of wiring, as well as safe delayed switching in industrial and residential applications, are all achieved.
Work & Installation (Input → Output Summary)
- ConnectAC or DC supply to the timer input.
- Connect theload(motor, lamp, or relay) to the timer output contacts.
- Connect asingle push button in series with the timer coil input.
- Set thedesired delay time on the timer.
- Ensure proper neutral and earth connections.
- Press the button to energize the timer; load activates after the delay.
Testing & Final Adjustments
- Verify all wiring: supply, timer coil, output contacts, push button, load, neutral, and earth.
- Press the push button and confirm the load activates after the preset delay.
- Adjust the timer to ensure correct delay timing.
- Inspect neutral and earth continuity for safety.
- Test multiple cycles to verify repeatable operation.
- Ensure timer rating matches load voltage and current.
- Label timer terminals and push button connections.
- Check for loose or exposed wires.
- Verify smooth operation without mechanical or electrical issues.
- Document wiring and test results for maintenance reference.
Frequently Asked Questions - One Button in Timer Wiring Diagram:
What is a one-button timer?
A timer that controls a load with a single push button, activating after a preset delay.
Where is it used?
For motors, lights, or automation circuits requiring delayed operation.
How does it work?
Pressing the button energizes the timer coil, and after delay, output contacts activate the load.
Can it control motors?
Yes, suitable for delayed motor starts.
Is earthing required?
Yes, for safe operation and electrical protection.
Can multiple loads be connected?
Yes, if the timer output rating matches the total load.
How to set delay time?
Adjust the built-in timer setting according to the requirement.
Is it suitable for AC and DC?
Yes, depending on the timer’s rated supply type.
How to test it?
Press the button and observe that the load activates after the set delay.
Why use a single push button?
To simplify wiring and control with easy operation.