Geyser Wiring Diagram
Learn geyser water heater wiring, including MCB, thermostat, heating element, and earth connection for a safe, efficient hot water supply at home.
water heater electrical connection
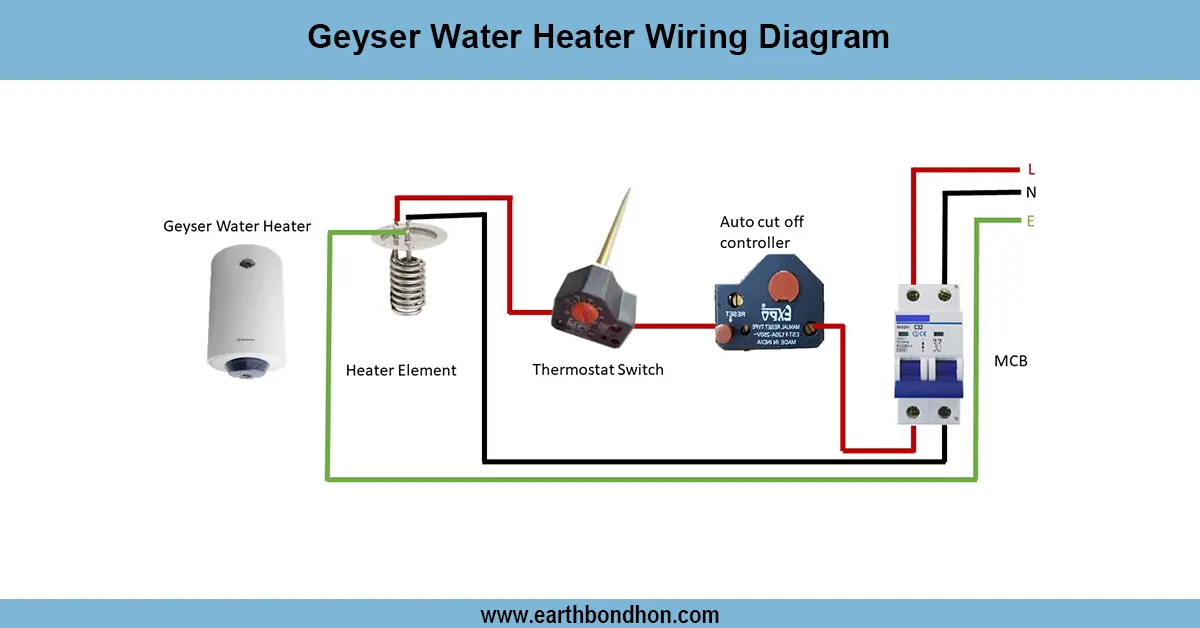
Geyser water heater wiring is a safe, efficient connection between the AC supply, thermostat, heating element, and the earth. Adequate connections are used to avoid electric shocks, overheating, and to maintain a constant supply of hot water.
residential water heater wiring
The wiring diagram of geysers water heaters describes proper electrical connections of domestic hot water systems. AC supply is fed in through a main MCB/fuse to guard against overloads. The line links with the heating element through a thermostat, which controls the temperature. The heating element is directly wired to neutral, and earth is also connected to the body of the geyser, which is made of metal to allow it to be safe. Indicator lamps can be added to indicate heating status. Correct wiring eliminates short circuiting, overheating, and electrical risks. Testing: The geyser has to be switched ON, the thermostat has to be checked to be working, the heating element should be checked to be heating the water, and the earth connection should be checked. This type of wiring is widely adopted in residential bathrooms and provides an efficient, safe, and reliable supply of hot water.
Work & Installation (Input → Output Summary)
- AC Supply connects to main MCB/fuse for protection.
- Line from MCB goes to thermostat, then to heating element.
- Neutral connects directly to the heating element.
- Earth connects to the geyser body for safety.
- Indicator Lamp (optional) shows geyser heating status.
- Proper wiring ensures safe operation, prevents overheating, and protects against electric shocks.
Testing & Final Adjustments
- Verify all wiring connections: line, neutral, earth, thermostat, and heating element.
- Check MCB/fuse rating and functionality.
- Switch ON geyser; thermostat should control heating element.
- Ensure water heats to the set temperature and the thermostat cuts off power automatically.
- Inspect the earth connection using a multimeter to ensure grounding.
- Check indicator lamp operation if installed.
- Verify insulation of all wires and secure mounting of thermostat and heating element.
- Ensure no leakage current or loose connections.
- Test multiple heating cycles to confirm reliable operation.
- Document wiring diagram and installation details for future reference.