

Motion Sensor Wiring Diagram
Learn about two motion sensors with two security light wiring diagrams, step-by-step installation, working principles, and a testing guide for home and office safety.
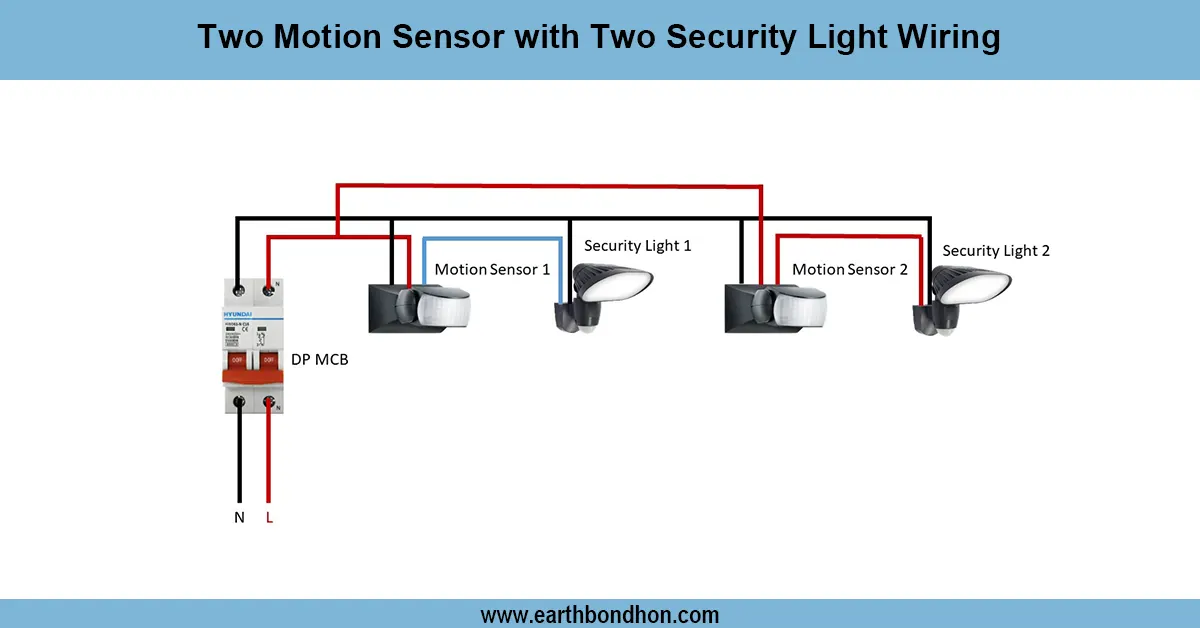
two motion sensor security light diagram
The two-motion sensor operates on two sets of security light wiring and gives the sensor the ability to control either one or both lights. Phase wires pass through the sensor, RS, and the neutral is directly connected and will automatically work on the detection of motion.
two sensor two light wiring guide
A two-motion sensor and two security light wiring solution enables two independent motion sensors to operate in control of two security lights or in combination to increase security. The individual PIR motion sensors identify a motion within their radius and turn on their associated security lights. In the wiring, the phase supply line is wired to the live terminal of every sensor, and the load terminal of every sensor is wired to the corresponding light. Both sensors and lights are directly connected to the neutral wires of the supply. Use of this system is best suited to bigger landscapes, such as driveways, gardens, and building perimeters. Another way to set up sensors to operate lights in both directions is to use the sensor outputs in parallel. Insulation and safe wiring assure safety, reliability, and effective detection.
Work / Installation (Inputs → Outputs)
- Input: Line (phase) and neutral from supply.
- Output: Two security lights connected through two PIR sensors.
steps:
- Connect phase wire from supply to the live terminal of each PIR sensor.
- Connect the load terminal of each sensor to the phase terminal of its respective security light.
- Connect neutral wires directly from supply to both sensors and lights.
- Connect earth wires to each light for safety.
- Adjust sensitivity, delay, and lux settings on each PIR sensor.
- Test each sensor individually and then both together to ensure correct operation.
Testing and Final Adjustments
Once wired, ensure that all the terminals are tight and well insulated. Turn ON the supply. Wander in the field of detection of each sensor, one light at a time, is supposed to be on. Delay time is the duration of one light remaining ON when motion is no longer occurring. Change the range and lux setting to restrict operation to night or daytime. In a parallel setup, test the two sensors at the same time to check that there is no interference and that the two lights work together, provided they are set in parallel. Make sure that all connections are insulated, that earth connections are sound, and that sensors are mounted at the right angles.