
Tube Light connection
Learn how to wire a tube light with choke, starter, and ballast. Step-by-step diagram for proper phase, neutral, and earthing connections.
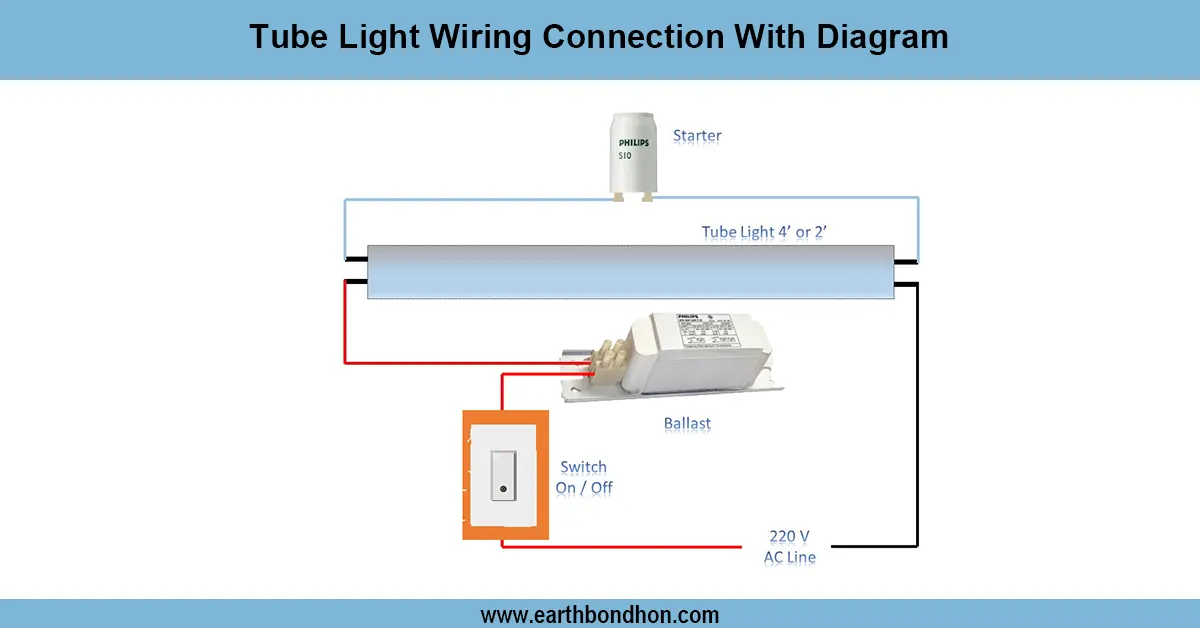
tube light connection with choke
Tube light wiring is wired with the phase passing through a choke and starter onto to tube ends, with Neutral then passing on to the other side. The starter is used to aid in ionizing the first time around, and the choke provides control over current flow.
fluorescent tube wiring system
A tube light wiring connection is a simple electrical connection found at home, in the workplace, and in industry. There are four essential parts of a fluorescent tube: the tube light, the choke (ballast), the startand the capacitor (not mandatory, to improve power factor). One end of the choke is connected to the Phase (Line) wire, and to one pin of the tube light. The other extremity of the choke is joined to the starter, and the other extremity of this type of tube. The other end of the tube light is connected to the other pin opposite the Neutral wire. When the switch is ON, current is passed through the choke and starter to warm the filament in the tube, producing ionization. When the tube is ionized, the tube light begins to glow. The earthing must be properly earthed, also to ensure safety.
Work / Installation (Inputs → Outputs)
- Input: Phase (Line) → Switch → Choke → Tube pin A
- Starter: Between Choke and Tube pin B
- Neutral: Direct → Tube pin C
- Output: Tube emits light after ionization
Testing and Final Adjustments
Once all the parts have been hooked up, turn ON the supply. The starter will be flickering because it will be heating the tube filaments. The tube will then glow after two or three seconds. When the tube is not glowing, check the starter, choke, and they could be defective. Make sure that all wire intersections are closed off and insulated. With a multimeter, measure the voltage of the check supply (usually 220 V -240 V AC). Where flickering occurs, change the starter or capacitor. To be on the safe side, leave the switch off when handling wiring. Always select the correct color-coded wires: red/brown Phase, black/blue Neutral, and green/yellow Earth.